Materials:
stitched piece, leaving a generous margin around the design. My design was 9 cm x 16cm (3 1/2″ x 6″) and I added a 1-cm seam allowances for this project
fabric of the same size - I tend to cut mine slightly larger
ribbon for the hanger
Beaded trim
lace
sewing thread that matches.
Tools:
ruler or measurer’s tape
scissors
(optional) pinking shears
pins
seam ripper or small pointed scissors
chopstick or whatnot to turn your work inside out and make crisp corners
hand-sewing needle
Sewing machine (optional)
This is a very easy project, and while a sewing machine will make your work go quicker, you can do this by hand. Anyone can do this project

Step 1: Cut backing fabric slightly larger than stitched piece, For this particular design I have allowed 5cm from the edge of the design to the seam and 1cm for my seam. For the top allow the depth of your lace plus a further 5cm for turning over to make the top neat. - As you can see from my picture I didn’t remember to allow extra at the top and so had to make a cuff. Iron both pieces and turn fabric allowed for top over and iron flat.

Step 2: Either hand sew or machine stitch the 2 sides and the bottom together

Step 3: Trim the corner so that when you turn it to the right sides and gently push the corners out they won’t be bulky

Step 4: Turn the bag right sides out. Push the corners out gently.Iron your pouch - its not a bag til the handle is on!

Step 5: Measure the top of your bag (mine was 15cm) and cut your lace that size. Pin or tack your chosen lace to the top of the front of your back, then handsew into place only going through the lace and the front of the bag.

Step 6: Pin or tack your ribbon or cord for the handle (this should be cut to your chosen size), either to the inside of the bag where you can’t see the tails or to the outside of the bag where you will see the tails, then handstitch into place securely.

Step 7: Measure the size of the bottom of your bag and cut the beaded ribbon to size. Pin or tack into place on the back of your bag at the bottom so you can see the beads hanging down. Hand sew into place.

Step 8: I added some tiny glass beads to the ends of my lace for extra adornment. You could do the same.
This type of bag lends itself to all sorts of designs and sizes and trims. Let you imagination run riot instead of beads and lace you could add tassels and pom poms, ribbon and cording etc etc.
Remember too that this is my way of making these bags I’m sure there are other easier ways than this, but this is how I do them.
If you do make a bag please share it with us all so we can see.

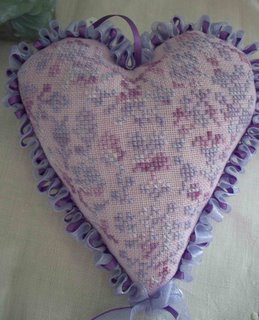
Ruched Ribbon Trim
Gosh its not as easy as it looks to photograph what you do, so I apologise if the photos aren't brilliant, I will write step by step as we go along though and hopefully that will make it a bit clearer, if not I'm sorry and you'll just have to ask me instead.

To begin with you need 3 lengths of ribbon, usually I estimate about 2 metre lengths for a small hanging pillow so in total it would be 6 metres if you were doing it in all the same colour ribbon, make sure they are all seperate lengths.Next fasten the 3 lengths of ribbon to the bottom point (in this case is the heart point), I usually slip stitch this together.

Now here I catch the ribbons with the needle and cotton pushing the needle through all the ribbon thickness

Then pull the thread towards you so that the ribbon ruches

Then catch the fabric through the seams with you needle this is about 1/4 inch intervals as I go along, then catch the ribbon again, this is usually about 1 inch intervals along the ribbon or however far or close you prefer the size of the ruches,


You do this all the way around your pillow until you get back to where you started I then catch the ribbons altogether and make a slight knot with them and fasten off, then trim the ribbons to length and you have the finished project.
